
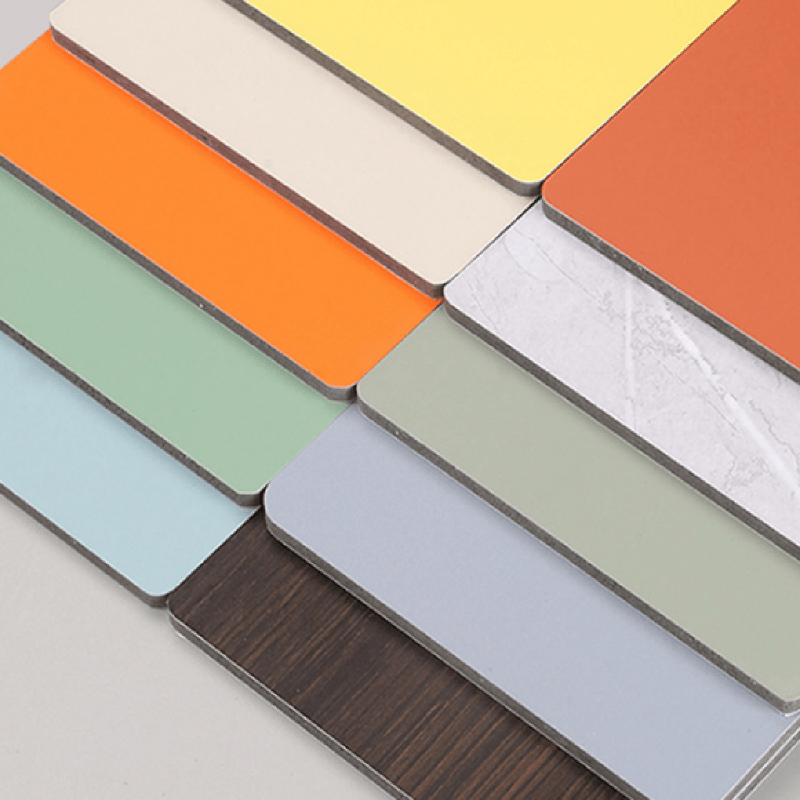
สิ่งจำเป็นก่อนการติดตั้งแผ่นผนัง SPC
รายการเครื่องมือและวัสดุที่สำคัญ
การเตรียมตัวสำหรับการติดตั้งแผ่นผนัง SPC เริ่มต้นด้วยการตรวจสอบให้แน่ใจว่ามีอุปกรณ์ที่จำเป็นครบถ้วน ขั้นแรก ควรมีตลับเมตรที่แม่นยำเพื่อให้แน่ใจว่าทุกอย่างพอดีเป๊ะ ระดับน้ำก็สำคัญไม่แพ้กัน เพราะไม่มีใครอยากได้ผนังเอียง อย่าลืมมีมีดคัตเตอร์ไว้ใช้ตัดแผ่นวัสดุ และควรเตรียมค้อนยางไว้ใช้เคาะชิ้นส่วนให้เข้าที่อย่างเบามือโดยไม่ทำให้อุปกรณ์เสียหาย ส่วนวัสดุที่ต้องใช้ แน่นอนว่าแผ่น SPC คือสิ่งแรกที่ต้องมี แต่ก็อย่าลืมกาวและแผ่นรองซึ่งเป็นตัวช่วยยึดโครงสร้างให้แน่นหนา การลงทุนในเครื่องมือที่มีคุณภาพดีจะช่วยให้การติดตั้งเป็นเรื่องง่ายขึ้นมาก จากข้อมูลภาคอุตสาหกรรมที่เราเคยเห็น พนักงานที่มีอุปกรณ์ครบครันมักจะเกิดข้อผิดพลาดในการติดตั้งลดลงประมาณ 30% ซึ่งหมายถึงผลลัพธ์ที่ดีขึ้นโดยรวม
การปรับสภาพแผง SPC: ทำไม 48 ชั่วโมงถึงสำคัญ
การนำแผ่น SPC ไปปรับตัวในสภาพแวดล้อมใหม่ก่อนติดตั้ง จะช่วยป้องกันไม่ให้แผ่นเกิดการบิดงอหรือเสียรูปในอนาคต ซึ่งผู้เชี่ยวชาญส่วนใหญ่แนะนำให้ปล่อยทิ้งไว้ประมาณสองวัน เมื่อแผ่นได้รับเวลาในการปรับตัวให้เข้ากับอุณหภูมิและความชื้นของห้องแล้ว ก็จะลดโอกาสที่แผ่นจะเกิดการบิดงอหลังจากติดตั้งเสร็จ สมาคมพื้นไม้เนื้อแข็งแห่งชาติได้แนะนำวิธีปฏิบัตินี้มานานหลายปีแล้ว หากใครข้ามขั้นตอนสำคัญนี้ไป ก็อาจต้องเสียค่าใช้จ่ายเพิ่มเติมในการแก้ไขปัญหาในภายหลัง การปรับสภาพให้เหมาะสมจึงมีผลอย่างมากต่อความทนทานของการติดตั้ง โดยเฉพาะในพื้นที่ที่ความชื้นเปลี่ยนแปลงตามฤดูกาล
หลักการพื้นฐานของการเตรียมผิวผนัง
การทำความสะอาดและปรับระนาบของวัสดุรองพื้น
การเตรียมผนังสำหรับติดตั้งแผ่น SPC เริ่มต้นด้วยการทำความสะอาดและตรวจสอบให้แน่ใจว่าผนังเรียบอย่างสม่ำเสมอ สิ่งแรกที่ต้องทำคือเช็ดพื้นผิวอย่างทั่วถึงเพื่อกำจัดฝุ่น คราบน้ำมัน และสิ่งสกปรกอื่นๆ ที่อาจเกาะอยู่ตามผนัง เพราะเศษสิ่งสกปรกเหล่านี้สามารถรบกวนประสิทธิภาพของการยึดติดของกาวได้อย่างมาก โดยช่างมืออาชีวส่วนใหญ่แนะนำให้ใช้ผ้าเปียกหรือใช้น้ำผสมสบู่ล้างจานในการขจัดคราบที่ฝังแน่นออกให้หมด การดำเนินการในขั้นตอนง่ายๆ นี้มีความสำคัญอย่างยิ่งต่อการติดตั้งแผ่นให้ยึดติดแน่นสนิท โดยไม่เกิดช่องว่างหรือฟองอากาศภายหลัง
ขั้นตอนถัดไปคือการปรับระดับ เพื่อเตรียมพื้นฐานให้เรียบเนียน การทำขั้นตอนนี้ให้ถูกต้องมีความสำคัญมากต่อทั้งรูปลักษณ์และการทำงานที่เหมาะสม เพราะผนังที่ไม่เรียบมักจะก่อปัญหาในระยะยาว แผ่นต่างๆ จะไม่สามารถติดตั้งได้อย่างพอดีหากพื้นผิวมีส่วนนูนหรือเว้า ให้ใช้ระดับน้ำที่มีคุณภาพดี และตรวจสอบระดับบนพื้นที่ต่างๆ ของผนัง เมื่อพบจุดที่ขรุขระหรือจุดต่ำระหว่างการตรวจสอบ ให้ทำการขัดให้เรียบอย่างระมัดระวัง หรืออุดด้วยวัสดุที่เหมาะสมตามแต่ละกรณี ควรใช้เวลาในขั้นตอนนี้ให้มากพอ เพราะการรีบเร่งในส่วนนี้มักนำไปสู่ปัญหาที่ยุ่งยากในภายหลัง ความแตกต่างระหว่างการติดตั้งระบบแผ่นผนังแบบมืออาชีพ กับการติดตั้งที่ดูเหมือนทำไปเพียงครึ่งๆ กลางๆ เริ่มต้นที่ขั้นตอนสำคัญนี้ ซึ่งคือการเตรียมพื้นผิวให้ถูกต้องเหมาะสม
การลงไพรเมอร์เพื่อการยึดเกาะที่ดีที่สุด
การเลือกไพรเมอร์ที่เหมาะสมกับพื้นผิวเป็นสิ่งสำคัญที่สุดที่จะทำให้แผ่น SPC ยึดติดได้ดี โดยสิ่งที่เรากำลังพูดถึงคือการทาสารรองพื้นหรือสีพื้นก่อนทำการติดตั้ง ซึ่งจะช่วยเพิ่มประสิทธิภาพในการยึดเกาะระหว่างกาวที่ใช้งานกับวัสดุผนังจริง นอกจากนี้ ไพรเมอร์ที่ดียังทำหน้าที่เสมือนสารกันซึมน้ำ ซึ่งมีความสำคัญอย่างยิ่งเมื่อต้องทำงานกับพื้นผิวที่หยาบ เช่น ผนังยิปซัมแบบธรรมดา หรือผนังคอนกรีตเก่าที่มักจะดูดซับความชื้น ผู้รับเหมาส่วนใหญ่จะยืนยันกับทุกคนที่ให้ความสนใจว่า การเลือกใช้ไพรเมอร์ที่เข้ากันได้ทั้งกับพื้นผิวผนังและกาวที่ใช้ไม่ใช่เพียงแค่คำแนะนำ แต่แทบจะเป็นสิ่งจำเป็นเพื่อให้แผ่นติดแน่นทนทานในระยะยาว
ส่วนใหญ่แล้วคนส่วนใหญ่จะใช้แปรงหรือลูกกลิ้งในการทาไพรเมอร์ ให้แน่ใจว่าทาได้เรียบเนียนสม่ำเสมอ การปล่อยให้แห้งสนิทก่อนติดตั้งแผ่นต่าง ๆ ก็สำคัญไม่แพ้กัน ไพรเมอร์มีบทบาทสำคัญมากในการช่วยให้ทุกอย่างเข้ากันได้อย่างดี ยิ่งไปกว่านั้นยังช่วยป้องกันปัญหาที่อาจเกิดขึ้นในอนาคต เช่น พื้นผิวที่ลอกเป็นแผ่น หรือแผ่นต่าง ๆ เริ่มเคลื่อนตัวหรือหลุดออกหลังการติดตั้ง ผู้รับเหมาที่มีประสบการณ์ในงานลักษณะนี้ต่างรู้ดีว่า การได้ผลลัพธ์ที่ดีนั้นต้องเริ่มจากการลงทุนในไพรเมอร์ที่มีคุณภาพก่อน ทางเลือกที่ราคาถูกกว่าอาจช่วยประหยัดเงินในตอนแรก แต่บ่อยครั้งกลับนำมาซึ่งความยุ่งยากในภายหลังขณะทำการตรวจสอบและบำรุงรักษา
การวางแผนผังและการตัดแผ่นอย่างแม่นยำ
การสร้างแบบจำลองการวัดที่แม่นยำ
การเชี่ยวชาญในการสร้างแม่แบบวัดขนาดที่แม่นยำนั้นมีความสำคัญอย่างมากเมื่อต้องการติดตั้งแผ่นผนังอย่างถูกต้อง เริ่มต้นด้วยการหยิบตลับเมตรและระดับน้ำขึ้นมา แล้ววัดขนาดผนังให้ตรงจุดที่ต้องการเลย การทำเครื่องหมายให้แม่นยำจะช่วยลดวัสดุที่สูญเสียไปโดยเปล่าประโยชน์ และทำให้ทุกอย่างตรงและเรียบร้อย เมื่อช่างติดตั้งสร้างแม่แบบจากขนาดที่วัดได้จริง แทนที่จะเดาสุ่ม สิ่งนี้จะช่วยให้พวกเขาไม่ต้องเสียเวลาแก้ไขหรือรื้อของออกในภายหลัง นอกจากนี้ควรทำภาพวาดแบบสรุปหรือร่างแบบคร่าวๆ เพิ่มเติม เพราะจะช่วยให้เห็นภาพรวมว่าทุกอย่างจะประกอบกันอย่างไร และสามารถตรวจจับปัญหาได้ตั้งแต่ก่อนที่มันจะเกิดขึ้น การใช้เวลาในขั้นตอนเตรียมการนี้ไม่ใช่แค่เพียงการหลีกเลี่ยงปัญหาในอนาคตเท่านั้น แต่ยังเป็นสิ่งที่ทำให้พื้นที่นั้นๆ มีรูปลักษณ์ที่เรียบร้อยสวยงามตามที่ทุกคนต้องการ
การวางแผนทิศทางแผ่นอย่างยุทธศาสตร์
การวางแผ่นวัสดุให้มีทิศทางที่เหมาะสมนั้นมีผลอย่างมากต่อรูปลักษณ์และการทำงานร่วมกันของผนัง โดยในการตัดสินใจว่าจะวางแผ่นวัสดุอย่างไร ควรพิจารณาปัจจัยต่างๆ เช่น ปริมาณแสงที่เข้าสู่พื้นที่ ขนาดที่แท้จริงของห้อง และลักษณะงานออกแบบที่ต้องการ แผ่นวัสดุที่วางในแนวตั้งมักทำให้ห้องดูสูงขึ้น ในขณะที่การวางในแนวนอนจะเหมาะกับพื้นที่ที่ต้องการเน้นความกว้าง การวางแผนอย่างรอบคอบไม่ได้คำนึงถึงแค่เรื่องรูปลักษณ์เท่านั้น แต่ยังช่วยลดวัสดุส่วนเกินที่ไม่จำเป็น โดยการวางชิ้นส่วนเล็กๆ ไว้ในจุดที่ไม่สะดุดตา ช่วยประหยัดค่าใช้จ่ายและยังทำให้ผลงานออกมาดูดี ผู้รับเหมาส่วนใหญ่จะยืนยันว่าวิธีการนี้ช่วยประหยัดทั้งเงินและปัญหาที่อาจเกิดขึ้นในอนาคต พร้อมทั้งทำให้ทุกอย่างลงตัวทั้งในแง่ของรูปลักษณ์และความพอดี
เทคนิคการตัดอย่างมืออาชีพเพื่อให้ได้ขอบที่เรียบร้อย
การติดตั้งแผงวัสดุให้ได้ขอบที่เรียบและสะอาดนั้นต้องอาศัยทักษะการตัดที่เชี่ยวชาญ หลายคนมักเลือกใช้เลื่อยไฟฟ้าเมื่อทำงานกับแผงมาตรฐาน แต่สำหรับวัสดุแผ่นบางนั้นสามารถใช้มีดคัตเตอร์ที่มีคุณภาพดีในการตัดได้เช่นกัน อย่างไรก็ตามความปลอดภัยต้องมาก่อนเสมอ ควรวางใบมีดไปตามขอบนำที่ตรงเสมอเพื่อให้ได้รอยตัดที่เรียบร้อย และตรวจสอบให้แน่ใจว่าพื้นผิวที่กำลังตัดอยู่นั้นไม่เลื่อนหรือเคลื่อนที่ขณะทำงาน เทคนิคเล็กๆ ที่ช่างมืออาชีพมักใช้คือการวางด้านที่สวยงามของแผงหงายขึ้นด้านบนขณะทำการตัด เพื่อป้องกันไม่ให้เกิดรอยแตกร้าวหรือสะเก็ดวัสดุหลุดออก ปฏิบัติตามหลักการเหล่านี้พื้นฐานเหล่านี้อย่างเคร่งครัด ทุกคนก็สามารถตัดแต่งแผงวัสดุได้อย่างสวยงามและติดตั้งออกมาได้อย่างน่าพอใจ
กระบวนการการทาสารยึดและติดตั้งแผ่น
การเลือกสารยึดก่อสร้างที่เหมาะสม
การเลือกใช้กาวสำหรับงานก่อสร้างที่เหมาะสมมีความสำคัญอย่างมากเมื่อติดตั้งแผ่น SPC เนื่องจากส่งผลโดยตรงต่อความทนทานและแรงยึดเหนี่ยวที่ยังคงอยู่ กาวที่ช่างมักเลือกใช้สำหรับงาน SPC คือผลิตภัณฑ์อย่าง Liquid Nails หรือ Gorilla Heavy Duty ซึ่งให้การยึดติดที่ดีและแห้งตัวค่อนข้างเร็ว รวมถึงมีความต้านทานต่อความชื้นได้ในระดับที่เหมาะสม จึงเป็นที่นิยมใช้กัน โดยเฉพาะในพื้นที่ที่มีความชื้นสูง เมื่อพิจารณากาวชนิดต่าง ๆ ผู้เชี่ยวชาญส่วนใหญ่แนะนำให้ตรวจสอบคุณสมบัติ เช่น อุณหภูมิที่ผลิตภัณฑ์ใช้งานได้ดีที่สุด และระยะเวลาที่ต้องใช้ในการบ่มให้แห้งสมบูรณ์ ซึ่งช่วยให้สามารถเลือกกาวที่เหมาะสมกับสภาพแวดล้อมในการติดตั้งนั้น ๆ ได้ ปัจจุบันผู้ผลิตมักให้ข้อมูลด้านประสิทธิภาพต่าง ๆ ไว้บนบรรจุภัณฑ์ ทำให้การเปรียบเทียบคุณสมบัติของผลิตภัณฑ์ต่าง ๆ ง่ายขึ้นสำหรับผู้ที่ต้องการเลือกใช้กาวที่ดีที่สุดสำหรับงานเฉพาะด้าน
รูปแบบการทา glue ที่เหมาะสมสำหรับการยึดติดสูงสุด
การใช้กาวให้ถูกวิธีมีความสำคัญอย่างมากในการติดตั้งแผ่น SPC ให้มั่นคง ผู้รับเหมามักนิยมใช้วิธีการปาดกาวเป็นแนวซิกแซกหรือการปาดกาวให้ทั่วทั้งแผ่น เนื่องจากวิธีเหล่านี้สามารถครอบคลุมพื้นที่ผิวได้ดี และช่วยป้องกันไม่ให้แผ่นเคลื่อนตัวระหว่างที่กาวกำลังเซตตัว วิธีซิกแซกเหมาะสำหรับพื้นที่ไม่เรียบ เพราะสามารถปรับรับกับลักษณะพื้นผิวที่ไม่สม่ำเสมอได้ดี ส่วนการปาดกาวให้ทั่วทั้งแผ่นจะช่วยสร้างแรงยึดเหนี่ยวสม่ำเสมอทั่วทั้งแผ่น ซึ่งช่วยปิดช่องว่างเล็กๆ ที่อาจเป็นช่องทางให้ความชื้นแทรกซึมเข้ามาในภายหลัง คู่มืองานก่อสร้างมักแนะนำวิธีเหล่านี้โดยเฉพาะ เนื่องจากความแข็งแรงในการยึดจับที่สำคัญมากเมื่อเวลาผ่านไปและแผ่นเริ่มตัวตั้งตัว การปฏิบัติตามคำแนะนำของผู้เชี่ยวชาญไม่ใช่เพียงแค่แนวทางปฏิบัติที่ดีเท่านั้น แต่ยังช่วยลดปัญหาที่อาจเกิดขึ้นในอนาคต เช่น แผ่นหลุดล่อนหลังจากใช้งานไปหลายเดือน
การจัดเรียงแถวเริ่มต้นและการรักษาแนวตั้งฉาก
การเรียงแผ่นแรกให้ตรงกันอย่างถูกต้องมีความสำคัญอย่างมากในการติดตั้งแผ่น SPC เมื่อแถวเริ่มต้นวางได้พอดี จะช่วยสร้างฐานที่มั่นคงให้กับโครงการทั้งหมด และทำให้ดูเป็นระเบียบเรียบร้อยโดยไม่มีช่องว่างที่รบกวนใจระหว่างแผ่นต่างๆ ช่างมืออาชีพส่วนใหญ่มักใช้เครื่องชั่งระดับเลเซอร์หรือขึงเส้นชอล์กบนพื้นผิวเพื่อตรวจสอบให้แน่ใจว่าทุกอย่างตรงกันอย่างถูกต้อง การตรวจสอบเล็กๆ น้อยๆ เหล่านี้ช่วยให้พวกเขาสามารถปรับแต่งสิ่งต่างๆ ได้ทันทีในสถานที่จริงก่อนที่จะดำเนินการไปมากกว่านี้ เราปฏิบัติตามแนวทางอุตสาหกรรมเกี่ยวกับระยะห่างและการวางแผ่นอย่างใกล้ชิด เพราะไม่มีใครต้องการให้ผนังดูเอียงหลังจากผ่านไปไม่กี่เดือน ผลลัพธ์ที่ได้คือ การติดตั้งที่คงทนแข็งแรงตลอดหลายปี โดยไม่เกิดการบิดงอหรือเคลื่อนตัวออกจากตำแหน่ง ซึ่งเป็นเหตุผลว่าทำไมช่างจำนวนมากจึงให้ความสำคัญกับการจัดแนวเป็นอันดับแรกเสมอตั้งแต่วันเริ่มต้น
เทคนิคการติดตั้งขั้นสูงสำหรับผลลัพธ์ที่ไร้รอยต่อ
ระบบแผงเชื่อมต่อกัน: การติดตั้งแบบคลิก-ล็อค
ระบบแผงแผ่นที่ล็อกต่อกันได้ โดยเฉพาะแบบมีระบบคลิกล็อก (Click Lock) ทำให้การติดตั้งแผ่นผนัง SPC ง่ายขึ้นมาก ยังคงได้ผลลัพธ์ที่ยอดเยี่ยม และมีรูปลักษณ์สวยงามเมื่อติดตั้งเสร็จสิ้น สิ่งที่ทำให้ระบบเหล่านี้ได้รับความนิยมคือความรวดเร็วในการติดตั้ง โดยไม่ต้องใช้เครื่องมือพิเศษหรือกาวเหนียวๆ ในการยึดติด เมื่อต้องการติดตั้งแผงแบบคลิกล็อก ให้เริ่มจากการจับลิ้น (Tongue) ของแผ่นหนึ่งเข้ากับร่อง (Groove) ของแผ่นถัดไป จากนั้นกดให้เข้าที่จนได้ยินเสียงคลิก เมื่อแผ่นเข้าที่แล้ว อย่าลืมจัดเรียงทีละแถว และตรวจสอบตลอดเวลาว่าทุกส่วนตรงกันหมด เพราะหากมีอะไรผิดพลาดเพียงเล็กน้อย ก็จะเห็นได้ทันที การใช้เวลาเพิ่มเติมเพื่อให้แน่ใจว่าแต่ละชิ้นเข้าที่อย่างถูกต้อง จะช่วยให้ผนังมีรูปลักษณ์ดูเป็นมืออาชีพ ไม่ใช่งานที่รีบเร่งจนออกมาดูไม่ดี
การใช้ค้อนาง каучук для การเชื่อมต่อข้อต่อที่แน่นหนา
เมื่อติดตั้งผนัง SPC ค้อนยางมีความสำคัญอย่างมากในการปรับแต่งรอยต่อระหว่างแผ่นให้พอดี เพื่อป้องกันไม่ให้มีช่องว่างหรือการจัดแนวที่ผิดพลาดในภายหลัง ช่างมักใช้ค้อนยางในการเคาะแผ่นอย่างเบามือจนกว่าทุกส่วนจะเข้าที่อย่างถูกต้อง วิธีการนี้ช่วยป้องกันปัญหาการบิดงอ และทำให้โครงสร้างโดยรวมมีความมั่นคง โดยทั่วไปช่างที่มีประสบการณ์จะเริ่มต้นจากมุมหนึ่งของพื้นที่ติดตั้ง จากนั้นค่อย ๆ เคลื่อนตัวไปตามแนวแผ่น พร้อมทั้งตรวจสอบให้แน่ใจว่าแต่ละส่วนเชื่อมต่อกันอย่างสม่ำเสมอ นอกจากจะช่วยให้ผลงานดูดีขึ้นแล้ว ยังช่วยยืดอายุการใช้งานของผนังได้ด้วย สามารถทนต่อการเปลี่ยนแปลงของสภาพอากาศและปัจจัยแวดล้อมอื่น ๆ ที่อาจก่อให้เกิดความเสียหายในระยะยาว
การจัดเรียงข้อต่อแบบสลับและจัดการช่องว่างสำหรับการขยายตัว
การจัดวางข้อต่อให้เยื้องกันในขณะติดตั้งแผ่นผนัง SPC นั้นสร้างความแตกต่างทั้งในด้านโครงสร้างและด้านทัศน์ คือเมื่อข้อต่อระหว่างแถวถูกจัดวางให้เยื้องกันแทนที่จะตรงกันทุกแถว จะช่วยให้น้ำหนักกระจายตัวได้ดีขึ้นทั่วทั้งพื้นที่ผิว โดยวิธีนี้จะช่วยลดจุดอ่อนที่มักเกิดขึ้นในงานติดตั้งที่ข้อต่อทุกจุดตรงกันอย่างพอดี นอกจากนี้ยังต้องให้ความสำคัญกับช่องว่างสำหรับการขยายตัวด้วย เนื่องจากอุณหภูมิและความชื้นสามารถทำให้วัสดุเกิดการขยายตัวหรือหดตัวตามกาลเวลา การติดตั้งตัวแยกขนาดเล็กในช่วงระยะที่เหมาะสมจะช่วยรักษาระยะห่างที่ถูกต้องระหว่างแผ่นกับพื้นผิวรอบข้าง เช่น ผนังหรือกรอบประตู การทำสิ่งเหล่านี้ให้ถูกต้องตั้งแต่เริ่มต้นจะช่วยป้องกันปัญหาการบิดงอ และยืดอายุการใช้งานงานติดตั้งให้อยู่ได้นานขึ้นก่อนที่จะต้องเปลี่ยนใหม่
การตกแต่งเพิ่มเติมสำหรับแผงผนัง SPC มืออาชีพ
การติดตั้งขอบและแม่พิมพ์รอบบริเวณ
การเพิ่มชิ้นส่วนแต่งขอบและบัวให้กับแผ่นผนัง SPC นั้นช่วยให้ดูสมบูรณ์แบบและให้ความรู้สึกที่เรียบร้อยแบบมืออาชีพที่ทุกคนต้องการ เริ่มต้นด้วยการวัดขอบของแต่ละแผ่นให้แม่นยำ เพื่อให้เวลาติดตั้งแล้วส่วนที่ตัดมาพอดีเป๊ะ เมื่อเลือกชิ้นส่วนตกแต่ง ควรเลือกแบบที่เข้ากับสิ่งที่มีอยู่เดิมบนผนัง บางคนชอบแถบอลูมิเนียมแบบเรียบหรู ส่วนอีกหลายคนก็ชอบบัว PVC ที่ดูเด่นขึ้นมาหน่อย อย่าลืมให้ความสำคัญกับมุมต่างๆ ด้วย! เพราะการติดตั้งที่ไม่พอดีในมุมจะทำให้ทั้งหมดพัง ดังนั้นควรตรวจสอบให้แน่ใจก่อนที่จะใช้กาวติด อย่าลืมว่าต้องใช้กาวให้เพียงพอ แต่ไม่มากเกินไปเช่นกัน การจัดแนวให้ถูกต้องตั้งแต่แรกจะช่วยลดปัญหาที่จะตามมาได้ และหลีกเลี่ยงรอยแยกที่น่ารำคาญใจซึ่งไม่มีใครอยากเห็นในห้องที่เพิ่งตกแต่งเสร็จ
การปิดขอบด้วยซิลิโคนเพื่อให้ผิวหน้ากันน้ำ
การใช้ซิลิโคนปิดรอยต่อให้สนิทมีความสำคัญอย่างมากในการทำให้แผ่น SPC กันน้ำได้และมีอายุการใช้งานยาวนานขึ้น ซิลิโคนจะทำหน้าที่เป็นแนวป้องกันน้ำเข้าอย่างมั่นคง ซึ่งหมายถึงโอกาสที่ลดลงในการเกิดความเสียหายหรือการบิดงอของแผ่นวัสดุในระยะยาว สำหรับพื้นที่ที่มีความชื้นสูง เช่น ห้องน้ำและห้องครัว ควรเลือกใช้ซิลิโคนคุณภาพดีที่ช่วยป้องกันการเกิดเชื้อราด้วย อย่าเลือกใช้ของราคาถูกในขั้นตอนนี้ เพราะวัสดุคุณภาพต่ำจะไม่สามารถทนต่อสภาพแวดล้อมที่มีความชื้นได้ ควรบีบซิลิโคนให้เป็นเส้นต่อเนื่องตลอดแนวแต่ละด้านเพื่อไม่ให้มีจุดใดตกหล่น การเว้นช่องว่างไว้อาจก่อให้เกิดปัญหาในอนาคต การปิดผนึกอย่างถูกต้องนั้นไม่เพียงแค่ปกป้องแผ่นวัสดุเท่านั้น แต่ยังช่วยให้ทุกส่วนของการติดตั้งยึนคงทนถาวร ซึ่งหมายความว่าเจ้าของบ้านจะไม่ต้องเสียค่าใช้จ่ายในการเปลี่ยนวัสดุใหม่ในเร็ววัน
เคล็ดลับการดูแลหลังการติดตั้ง
แนวทางการทำความสะอาดสำหรับพื้นผิว SPC
อายุการใช้งานของแผงผนัง SPC ขึ้นอยู่กับการทำความสะอาดและการบำรุงรักษาที่เหมาะสมในระยะยาว สำหรับการทำความสะอาดประจำวัน ให้ใช้สบู่อ่อนผสมกับน้ำอุ่นและผ้าเนื้อนุ่ม วิธีนี้เหมาะสำหรับการเช็ดฝุ่นและคราบสกปรกเล็กน้อยโดยไม่ทำลายพื้นผิวของแผงผนัง ควรหลีกเลี่ยงวัตถุที่มีลักษณะหยาบหรือมีฤทธิ์กัดกร่อน และไม่ควรใช้สารเคมีทำความสะอาดที่มีความเข้มข้นสูงซึ่งอาจทำให้เกิดรอยขีดข่วนหรือกัดสีผิวชั้นนอก ผู้เชี่ยวชาญส่วนใหญ่แนะนำว่าการใช้วิธีทำความสะอาดพื้นฐานจะช่วยให้แผงผนังเหล่านี้คงสภาพสวยงามไปได้นานกว่าที่คาดคิด นอกจากนี้ อย่าลืมจัดทำตารางบำรุงรักษาเป็นประจำ เช่น ทุกหนึ่งหรือสองสัปดาห์ ขึ้นอยู่กับระดับการใช้งาน เพื่อทำการเช็ดทำความสะอาดจุดที่มีปัญหาเล็กน้อยก่อนที่ปัญหาเหล่านั้นจะลุกลามกลายเป็นประเด็นใหญ่ในอนาคต
การแก้ไขปัญหาที่พบบ่อยในการติดตั้ง
หลายคนมักพบปัญหาในการติดตั้งแผ่นผนัง SPC โดยเฉพาะในเรื่องที่เกี่ยวข้องกับแผ่นที่ไม่เข้าที่หรือกาวที่ยึดไม่อยู่ ซึ่งทั้งสองปัญหานี้ทำให้รูปลักษณ์สุดท้ายออกมาไม่ดี เมื่อแผ่นไม่ตรงกัน มักเกิดจากความผิดพลาดในการวัดระยะหรือลืมตรวจสอบว่าผนังนั้นระดับจริงหรือไม่ การแก้ไขคือย้อนกลับไปตรวจสอบให้แน่ใจว่าผนังเรียบก่อนเริ่มต้น จากนั้นจึงขีดเส้นนำบนพื้นผิวเพื่อใช้เป็นแนวทางในการติดตั้ง ปัญหากาวหลุดล่อนมักเกิดเพราะเลือกใช้กาวที่ไม่เหมาะสมหรือใช้ปริมาณไม่เพียงพอ ทางที่ดีควรเลือกใช้ผลิตภัณฑ์ประเภทก่อสร้างที่ออกแบบมาโดยเฉพาะสำหรับงานนี้ และควรทาให้ทั่วทั้งพื้นผิวด้วยลวดลายที่สม่ำเสมอ ช่างที่มีประสบการณ์มานานหลายปีต่างเล่าถึงการติดตั้งที่ท้าทาย ซึ่งต้องปรับเปลี่ยนวิธีการระหว่างดำเนินโครงการ บางครั้งแม้แต่เปลี่ยนกาวกลางคัน การให้ความสำคัญกับรายละเอียดเหล่านี้คือสิ่งที่ทำให้การติดตั้งออกมาดีและดูเป็นมืออาชีพ แทนที่จะดูเหมือนมือใหม่ ซึ่งจะช่วยลดปัญหาที่ตามมาจากการแก้ไขข้อผิดพลาดในภายหลัง
คำถามที่พบบ่อย
ฉันควรปล่อยให้แผงผนัง SPC ปรับสภาพนานเท่าไหร่ก่อนการติดตั้ง?
คุณควรปรับสภาพแผงผนัง SPC อย่างน้อย 48 ชั่วโมงในห้องที่จะติดตั้ง เพื่อให้พวกมันปรับตัวเข้ากับอุณหภูมิและความชื้นของสภาพแวดล้อม
เครื่องมือใดที่จำเป็นสำหรับการติดตั้งแผงผนัง SPC?
เครื่องมือที่จำเป็นประกอบด้วยเทปวัด เลเวล มีดพับ ค้อนางUM Rubber mallet กาวยึด และแผ่นรองใต้ เพื่อให้มั่นใจในการตัดที่แม่นยำ การจัดแนวที่สม่ำเสมอ และการติดตั้งที่มั่นคง
ทำไมการทาไพรเมอร์บนพื้นผิวรองรับถึงสำคัญ?
การทาไพรเมอร์ช่วยเพิ่มความแข็งแรงของการยึดเกาะระหว่างกาวยึดและพื้นผิวผนัง มันทำหน้าที่เป็นชั้นเคลือบปิดผิวที่ซึมซับและช่วยให้เกิดการยึดเกาะที่ดีที่สุด ลดความเสี่ยงของการเลื่อนหลุดของแผงในระยะยาว
ฉันจะแก้ไขปัญหาการไม่เรียงตัวของแผงระหว่างการติดตั้งอย่างไร?
ตรวจสอบความเรียบของผิวผนังและใช้เครื่องหมายชี้นำเพื่อความแม่นยำ ตรวจสอบการวัดซ้ำเพื่อให้แน่ใจว่ามีการจัดแนวที่ถูกต้องและลดความเสี่ยงของการไม่เรียงตัว
ฉันจะทำอย่างไรให้แน่ใจว่าแผงผนัง SPC ของฉันมีผิวที่กันน้ำได้?
ใช้ซิลิโคนในการปิดผนึกขอบของแผง เพื่อสร้างเกราะป้องกันความชื้น เลือกซิลิโคนคุณภาพสูงที่ต้านเชื้อราได้ เหมาะสำหรับสภาพแวดล้อมที่มีความชื้นสูง